1. Introduction
This document describes all relevant steps to install and administer translationstudio in FirstSpirit.
1.1. Requirements
The translationstudio Application has to be installed already. Please consult the translationstudio Technical Data Sheet for a detailed list of requirements.
1.2. Components
The FirstSpirit Module handles all aspects of the functionality of translationstudio that are available within FirstSpirit, such as
-
Configuring the translationstudio software with an easy to use configuration panel.
-
Handling of workflows for translation requests.
This module will be installed on the FirstSpirit Server.
2. Architecture
While the FirstSpirit Module (FSM) has to be installed and configured using the FirstSpirit ServerManager, the translationstudio Application can be installed on any server, unless a sharing of resources is possible.
Both modules, or “programmes”, communicate with each other using a specific port the translationstudio Application binds to. The translationstudio Application will connect to FirstSpirit using the FS_ACCESS API.
2.1. FirstSpirit FSM Module
The FirstSpirit Module (FSM) provides all means necessary to use Translation Studio in FirstSpirit and to communicate with the translationstudio Application. However, all parts of FirstSpirit Module work within the context of FirstSpirit and its clients.
2.2. Shared Resources
The FirstSpirit Server requires write access to the translationstudio Application’s working/preview-files/temp directory to deploy generated translation preview files by FirstSpirit.
If the translationstudio Application is installed on a server different from the FirstSpirit server, please make sure that the respective folder is available, e.g. using a permanently mounted directory.
2.3. Security Issues
Please make sure that the port both programmes use for communication is accessible and not blocked by a firewall. In addition, if the translationstudio Application runs on a different server, both servers have to be able to communicate with each other. Finally and importantly, please make sure that the port used by the translationstudio Application is not publicly accessibly but only within your network, and preferably limited to those servers requiring it, according to your security policies.
3. Installation
The installation process consists the following steps:
-
Deploying the FS isolated runtime jar
-
Installing the translationstudio FSM
-
Installing the translationstudio FragmentCreator MicroApp FSM
(optionally, only if you want to use translationstudio in the FragmentCreator) -
Configuring the translationstudio Module Permissions
3.1. Deploying the FS isolated runtime jar
Copy the fs-isolated-runtime.jar file from your FirstSpirit installation directory (e.g. /opt/firstspirit5/data/fslib/fs-isolated-runtime.jar) into the folder /opt/translationstudio/lib-plugins (you may also use a symbolic link) and restart the application.
3.2. Installing the translationstudio FSM
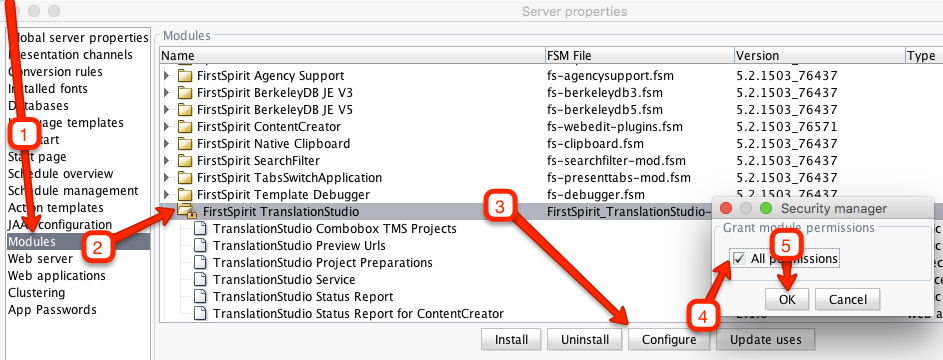
The translationstudio FSM Module has to be installed on the FirstSpirit Server. To do so, open the FirstSpirit ServerManager, access the server properties and select Modules. Click on the Install button as shown below and follow the steps below.

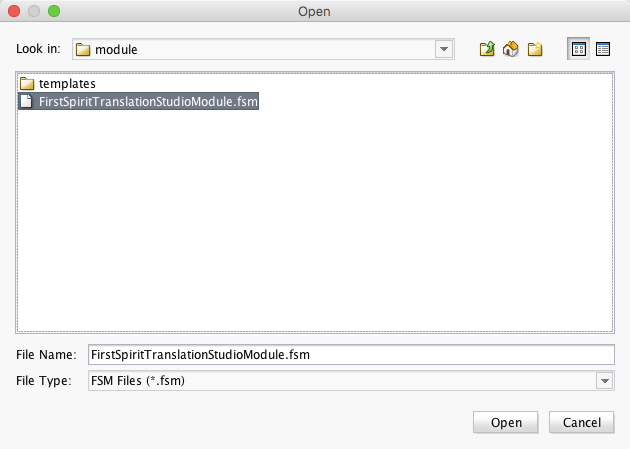
A new dialog opens and you have to navigate to the C:\translationstudio\install\temp\module folder (Microsoft Windows) or /home/fs5/translationstudio/install/temp/module folder (Linux) and the FSM file by selecting it and clicking on the button Open as depicted below.
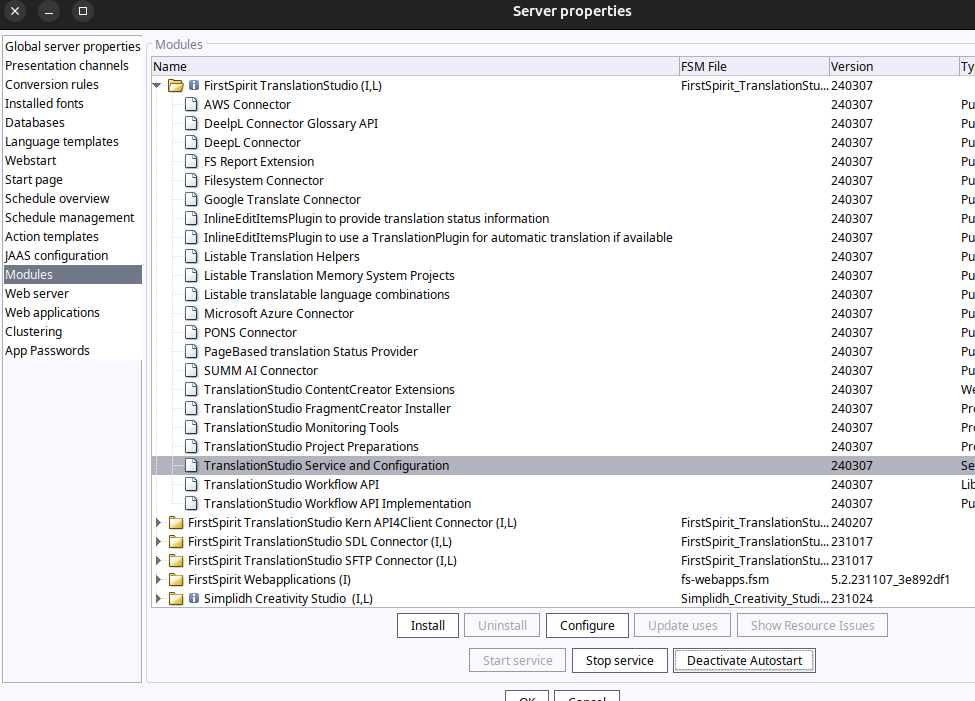
Once the module is installed successfully, you will find the list entry translationstudio with several items once expanded.
Select translationstudio Service and Configuration from the list and start the service if it has not already been started.
Once the service has started you can configure the module by selecting the module translationstudio and clicking on the Configure button. Please select the checkbox to grant all permissions as shown below.
| You need to close the FirstSpirit ServerManager and reload it after changing the module permissions. |
| Make sure the translationstudio servive component autostarts. This should be enabled by default. |
3.3. Installing the translationstudio FragmentCreator MicroApp FSM
To make use of translationstudio in the FragmentCreator, you have to install the respective translationstudio MicroApp FSM in the same way you installed the translationstudio FSM module.
| All FragmentCreator modules have to be installed already. |
Now, create a new global web app and name it tsmicroapp and add the translationstudio FragmentCreator CTX web component. Thereafter, you have to edit its web.xml and update the password value in the URL as shown below.
<context-param>
    <param-name>eureka.client.serviceUrl.defaultZone</param-name>
    <param-value>http://cxt_eureka:aaaaa@localhost:8000/fragments/eureka</param-value>
</context-param>
4. Installing translationstudio in a Project
4.1. FirstSpirit cloud
If you use translationstudio in FirstSpirit’s cloud offering, you should only need to add the translationstudio Project Preparations project component to your project. This will install/update all required elements. Thereafter, you only need to set the workflow permissions and configure your langauge mappings (see below).
4.2. FirstSpirit On-Premises Project
In order to use translationstudio, the following steps have to be reproduced:
-
Create a new database
-
Create a translationstudio user to access and edit the target project - The user has be a server administrator.
-
Grant user permissions
It is recommended to have a dedicated translationstudio database layer if you use multiple projects. This way, you can make use of the distribution feature to install/update translationstudio via its project component: see section Automatic Installation and Update in Projects below.
|
| You may use a derby database. Yet, this is not recommended for production environments. |
Finally,
-
add the translationstudio user to the project and set their permissions (see below for more detailsis needed)
-
add the translationstudio database layer to the project - schema has to have schema-sync enabled!
Save the changes to the project and re-open the project settings again. Now,
-
add the translationstudio project component
-
Create a new databse schema (it is recommended to set the name to
translationstudio, see below for more detailsis needed) -
Install the project component
-
Install templates and structures using the setup script
| If you made use of the automatic distribution feature (settings to be specified in the translationstudio configuration panel), everything should have been installed for you by now (jump to language mappings section.) |
The user has to be a server administrator. Make sure that nobody is accessing the project configuration (ServerManager) during the installation.
| The schema has to have schema-sync enabled. |
4.3. Install the Project Component
You can install translationstudio in either
-
FragmentCreator project
-
generic project (non-FragmentCreator)
| Be sure to pick the correct component. You should not use the FragmentCreator project component in a non-fragment project! |
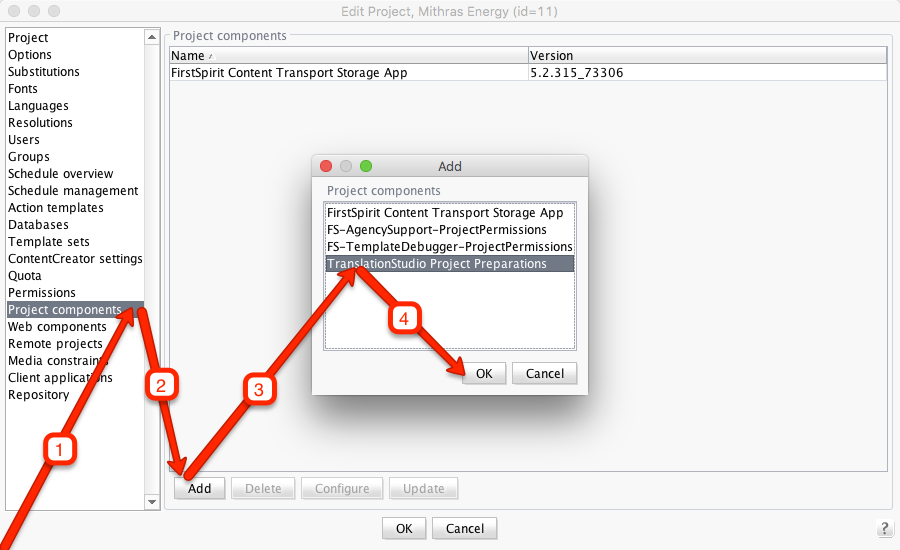
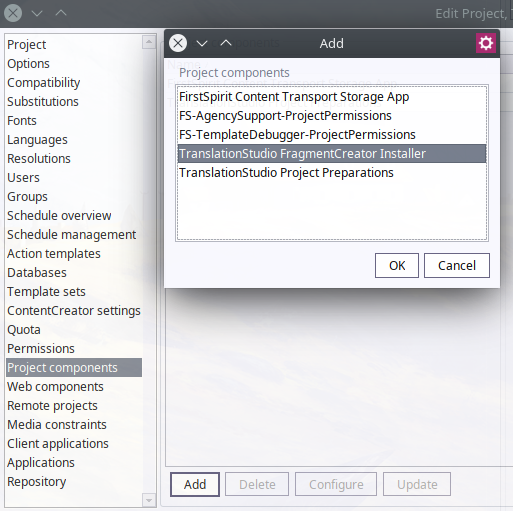
Edit the target project using ServerManager, select Project components from the settings list and click on the add button. A window will open allowing you to choose from a list of various installed components.
Generic Project
To install translationstudio in a generic (i.e. non-FragmentCreator) project, select translationstudio Project Preparations and click on the OK button.
FragmentCreator Project
To install translationstudio in a FragmentCreator project, select translationstudio FragmentCreator Installer and click on the OK button.
By adding the respective project component, a setup script will be created in this project (see below for further information)
You may now store the changes by closing the window using the OK button.
| The installation script will only be visible to administrator groups by default. Please change the permissions if necessary. |
| If you activated the automatic distribution, the install script will be executed automatically once you have added the project component. |
4.4. translationstudio User Permissions
Open the SiteArchitect and access the target project to grant the following permissions to all, Page Content/PageStore, Site Structure/SiteStore and Global Settings/Global Content Area:
-
Visible, Read, Change
-
Create object / Create folder
-
Remove Object
-
Show Metadata
-
Change Permission
Note of Clarification
Unfortunately, the translationstudio user requires change permission rights in order to use an essential FirstSpirit feature to export and import data from FirstSpirit. translationstudio itself will not meddle with your permission settings at any time.
A detailed instruction how to create users may be found in the official FirstSpirit Manual for Administrators. To change or assign user permissions in a project please consult the official FirstSpirit SiteArchitect (Manual for Editors and Project developers).
4.5. Create a new database schema
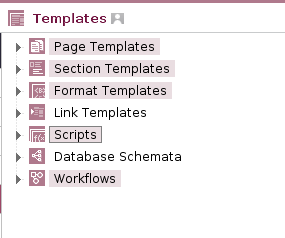
To create a new database schema, select the template store, right-click on Database Schemata and select Create new schema. In this example, a new schema called translationstudio will be assumed. You may also use an already existing schema.
4.6. Install Templates and Structures Using the Install Script
To create all required structures and scripts, right click on the newly created (or already existing) database schema and execute the script Install or Update translationstudio from Execute Script - translationstudio in the context menu.
The script will add a database table to the schema, install all required scripts and folders (Page content, Data sources, Templates, Global Settings). What is more, the script will also create all necessary scheduled tasks.
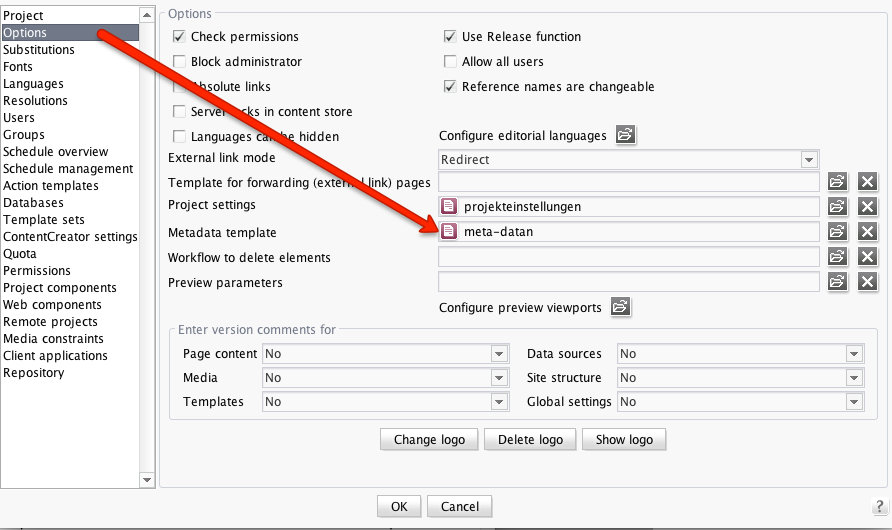
Importantly, translationstudio requires an assigned meta data template to work properly. If the project does not have a meta data template, the setup process will create a new one. However, it has to be assigned using the FirstSpirit ServerManager.
If a meta data template has been set, the script will add the required section automatically and no further action is required by the administrator. To assign this meta template, open the FirstSpirit ServerManager and navigate to the configuration of your project and select Option from the list. Select the target meta template in the select field Metadata template and click OK.
Now you can go back to the SiteArchitect and make the necessary changes to the form of the Metadata template as described in the section above.
Avoid Privilege Limitations
Although the meta template is created or the required form fields are added to the existing meta template automatically, a problem might occur if your current user does not have the permissions to change an already existing meta template. In that case, you may have to run the installation script again.
4.7. Configuring Language Mappings
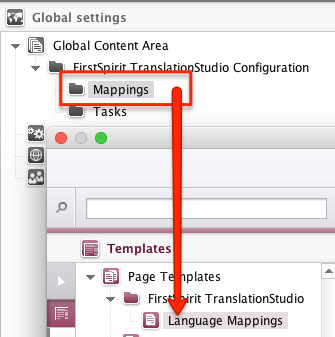
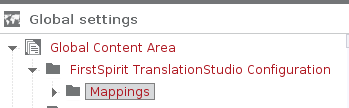
Language mappings are global content pages which allow you to define legitimate source and target language combinations as well as assign a target connector.
A language mapping page uses the page template fts_gca_mapping as shown below:
Visibility
The template Language Mappings is configured to be visible by default. That is because you should be able to create new Language Mappings immediately after installation. But we recommend setting the template to hidden, when you have create all language mappings needed.
To do this, open the properties of the template Language Mappings and change the attribute In selection list to hidden.
4.8. Adding a translationstudio Report and an Immediate Translation Helper Plugin to the ContentCreator
To add activate the Report and Immediate Translation Helper Plugin, you simply have to add a web component translationstudio ContentCreator Extensions to a ContentCreator web application.
| This feature is not available in a FragmentCreator project. |
You can add this either to the specific project’s ContentCreator app or to the global ContentCreator app (recommended).
| Project specific web apps increase your server load and it is usually just fine to add this feature to ContentCreator’s global web app. |
In the following, the extensions will be added to the project specific ContentCreator app.
Open the FirstSpirit ServerManager, edit the respective project’s properties and select Web components from the list on the left, click on the tab ContentCreator, click on the button Add and select the translationstudio plugin entry from the list and click on OK.

Thereafter, select the active web server. Finally, click on the button Install.
A dialog box will pop up asking you if you really want to proceed. After having confirmed this, you have to click on the button Execute now to start the process. After the installation process has finished, you have to active the web server.
The report component will now be available to your project in the ContentCreator. To use the TranslationHelper plugin, you have to configure the default AWS and/or DeepL connector first.
Further information on how to install and deploy web components may be found in the respective FirstSpirit manuals.
| You have to add this web component to all projects that wish to use the TranslationHelper. |
5. Automatic Installation and Update in Projects
translationstudio can be installed automatically whenever you its project component to a FirstSpirit project. In addition, translationstudio can also update its component in your projects automatically whenever you install a new version (via update uses).
All tables will be created/updated and necessary data sources created if necessary. In addition, required templates, scheduled tasks etc. will be added/updated automatically.
5.1. Requirements
To enable this feature, open the translationstudio configuration dialog and open the Distribute section.
| Using this feature requires a certain degree of "standardisation". |
translationstudio requires a schema in order to be installed successfully.
5.2. Creating a Generic Database Layer
Every translationstudio project requires a database. Automatic distribution requires the very same database layer to be available in every target project.
The layer has to be made available before the project component is added.
5.3. Installing translationstudio in a Project
If you want to install translationstudio simply by adding its project component automatically, you will have to meet the following requirements:
-
translationstudio has to be able to create its own schema by using an already existing database layer. The layer has to have already been added to the project with active schema sync.
-
All target projects have to have the same output channel used for creating preview pages.
| you will still be able to trigger the install/update script manually. |
| You should use translationstudio as schema name to keep things as simple as possible. |
7. Adding a new Connector
A connector basically consists of 2 parts. A FirstSpirit Connector module FSM and a connector JAR file to be deployed to the translationstudio Application.
7.1. Adding a new Connector Module
To install a connector’s FSM, please follow the instructions below.
-
Open ServerManager and navigate to the modules section.
-
Install or update your connector’s FSM
-
Re-open ServerManager
Now, you can configure the connector using translationstudio’s configuration gui.
Thereafter, the connector can be selected from the Connector list in the respective language mappings template.
7.2. Deploying the Connector’s JAR file
To deploy the connector’s JAR file, please follow the instructions below. If you use a connector provided by translationstudio, you may skip this section.
-
Stop the translationstudio Application
-
Deploy the JAR file to either, the
./libfolder or./lib-pluginsfolder (recommended) -
Start the translationstudio Application
8. Troubleshooting
8.1. Corporate Content
In general, translationstudio works fine with CorporateContent.
| You may want to consider using translationstudio’s automatic installation and update feature (see above). |
If you use CorporateContent and publish versions of translationstudio from its own project, please read the following sections carefully.
Do not change reference names
Do not alter the reference names of your CorporateContent package, e.g. by adding the package information to it resulting in reference names similar to refname@package.
8.1.1. Preparing Languages
Let’s say your translationstudio template project uses EN as a master language. Now, you want to setup a new project which needs translationstudio but which uses EN_GB as a master language.
Although it will not be a problem to transfer all necessary templates, the language mappings in translationstudio’s database templates will cause problems, because FirstSpirit will not update language mappings of language independent fields automatically, i.e. although the input components only use language independent fields, the language association will not be updated.
All you have to do is to add the new language to the translationstudio project (EN_GB in this example) and update the translationstudio database template’s language mappings manually.
8.1.2. Creating a Template Package
Create a subscription package which contains all of translationstudio’s templates, database and workflows. Relevant objects can easily be spotted as they are kept inside individual translationstudio folders.
Subscribing projects might have their own master language. It is essential that this master language is also available in the project offering the subscription packages. FirstSpirit will not update any table template language mapping.
8.1.3. Creating a Global Content and Site Structure Package
Each project using translationstudio requires the translationstudio workspace site structure folder and the translationstudio language mappings global content folder.

Therefore, create a package which allows to transfer these folders as well.
8.1.4. Copying Required Scheduled Tasks
Unfortunately, scheduled tasks (see ServerManager) cannot be transferred using CorporateContent but have to be copied into the target project manually:
-
fts_create_preview_files -
fts_preview -
fts_queue
8.1.5. Post Installation/Update Verification
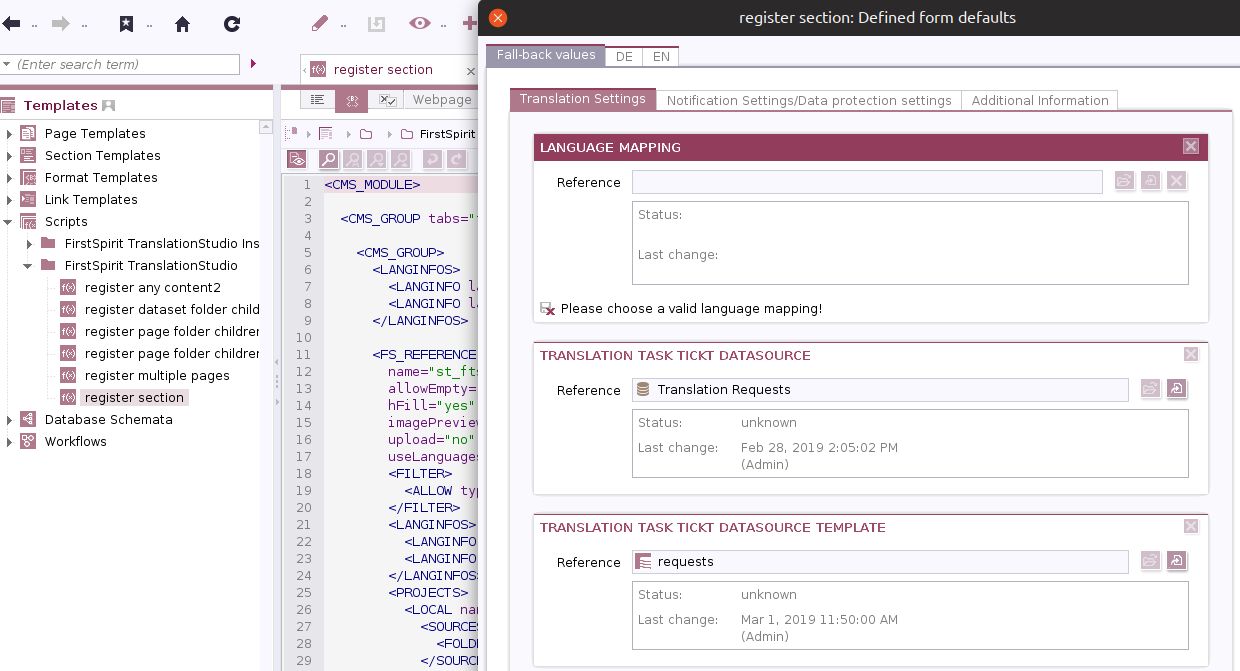
You may wish to verify that all settings have been updated correctly. To do so, navigate to the translationstudio scripts, open the "Form" tab and click on the "eye" icon left to the magnifying glass icon. The only field framed in red should be the mappings reference field. If this is the case, all is fine.
8.2. A connector cannot connect to a Translation Memory Server
Sometimes, a connector cannot establish a connection to a Translation Memory Server although the network settings are correct and the server should be reachable.
Usually, this happens when the server uses a self-signed certificate or a certificate which is not stored in the JDK’s keystore.
By default, the translationstudio Application will use the JDK’s default keystore, so you have to add the certificate and restart the translationstudio Application.
9. License and Copyright Information
translationstudio is a product of I-D Media AG, Cologne, Germany. All rights reserved, except for the software products listed in the following which are used in accordance with their respective licenses.
Each software package used in translationstudio is legally protected according to the given license information. This product includes software developed by the Apache Software Foundation.
| PACKAGE | LICENSE | LINK |
|---|---|---|
Apache HttpClient |
Apache License |
|
FirstSpirit API |
Apache License |
|
Jetbrains Annotations |
Apache License |