1. Introduction
translationstudio allows you to easily file translation requests without the need for later manual intervention.
At its core, translationstudio distinguishes between urgent translation requests (which will be processed immediately) and regular requests which will be processed if certain quotas are met.
In addition, translationstudio allows you to define how many pages and datasets should be included in one translatable XML file. This is a crucial aspect, because
-
Exporting a page requires FirstSpirit server resources
-
FirstSpirit pages will be packed in one XML file which is submitted to the Translation Memory System.
The latter aspect is of particular importance, because it allows you to control certain thresholds which guarantee a most efficient translation process. For example, too many files might increase the time needed for translation and splitting files might allow more translators to work on them at the same time.
translationstudio is very flexible and offers you a variety of means to customise its usage according to your specific needs. Most of these needs can be operationalised using a proper configuration of your module or workflows.
2. Configuring translationstudio
translationstudio can be self-hosted in your on-premise environment or hosted in a cloud.
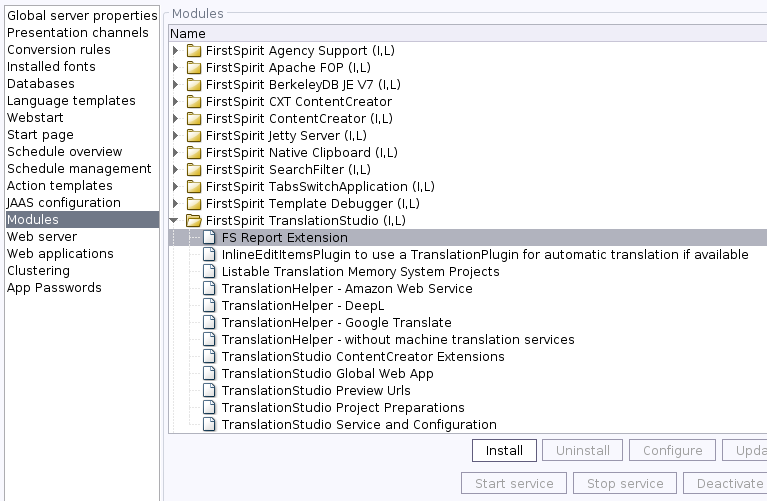
If self-hosted, you may access translationstudio’s complete configuration panel by opening the ServerManager’s server properties and selecting Modules. To configure the service, select the item translationstudio Studio Service and Configuration from the list and click the Configure button as depicted below.
If hosted in a cloud, you cannot access server properties but configure translationstudio by navigating to and configuring the translationstudio project component.
| It does not matter (nor does it make a difference) which project component you use to access the configuration. |
If you configure translationstudio via the project component, you do not need to consider certain settings such as connectivity because these information will be administered by your hoster. Hence, you can focus on only those aspects necessary to customise your translationstudio instance according to your needs.
You can configure the module at any time. Any changes stored will be sent to the translationstudio application automatically.
| Make sure to configure translationstudio and send it to the translationstudio application. If translationstudio has never been configured, it will start with a configuration template to make editing easier. Yet, it will be unable to connect to FirstSpirit and actually process your requests. |
2.1. Connections
This settings category allows you to configure the connection settings necessary for FirstSpirit to communicate with translationstudio and vice versa.
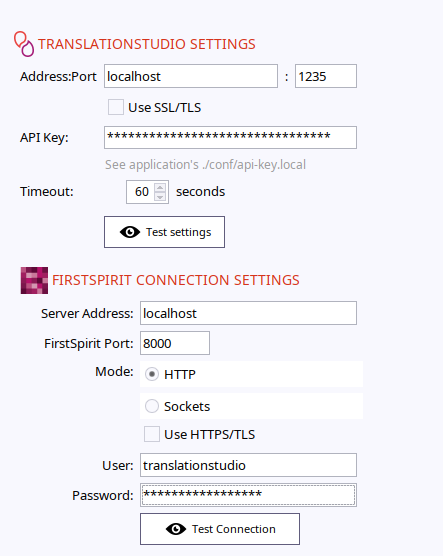
Please provide the address and port FirstSpirit will use to access the translationstudio Application.
| Please provide only the IP or server name. If you use names instead of IP addresses, make sure that the translationstudio server can resolve the FirstSpirit address. In addition, FirstSpirit has to be able to resolve the translationstudio address. |
You can test the connections by clicking on the respective Test Connection button.
| TLS/SSL should only be used if you installed translationstudio with TLS encryption - simply checking the box does not automatically activate TLS in the translationstudio Application. |
The translationstudio Application uses the given FirstSpirit user to access the respective projects. Make sure that this user has project access to all projects using translationstudio.
If your FirstSpirit requires a proxy configuration when connecting to it via FS API, you need to edit translationstudio’s configuration file ./conf/fs-proxy.properties and change the properties accordingly. A restart of the translationstudio application is required.
| The proxy properties file will be created automatically during startup if it has not yet been created. |
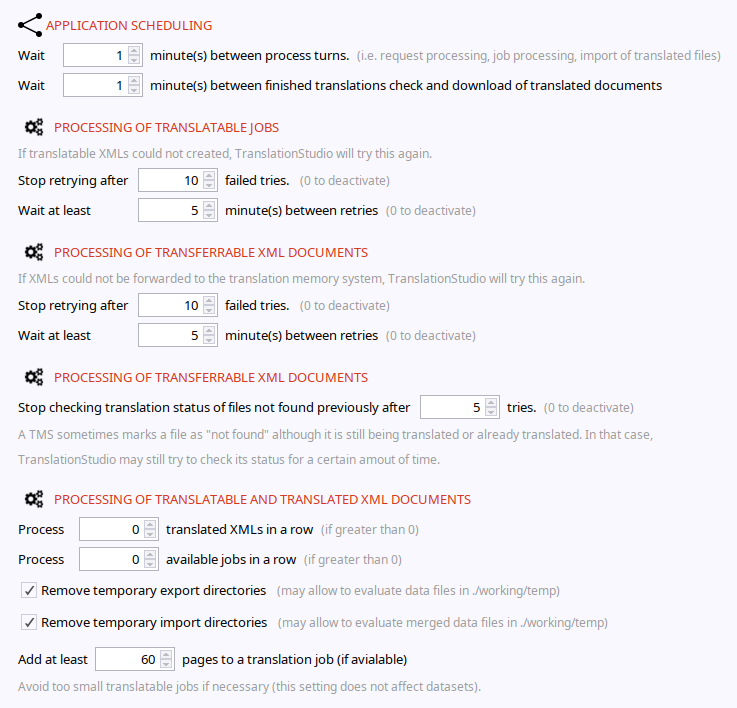
2.2. Management
translationstudio has two processes which can be scheduled independently from one another:
-
Sequential Iteration Process
This process processes translation requests, checks for quotas, creates translatable XML files and forwards them to a connector -
In Translation Monitoring
This process regularly queries the translation status of all files forwarded to a connector and downloads the translated documents if the translation has been completed.
Depending on your workload and translation timings it might be a good idea to configure the scheduling. By default, each process will be executed after a one minute break.
Usually, translations take longer and it might be enough wait for 1h between two translation checks.
These settings can be used to control the workload. Since exporting and importing data from and into FirstSpirit might impose significant workload on the server, you may want to avoid intense workload during your office hours. These settings allow you to consider such necessities.
Sometimes, you may need to analyse the exact data being exported from or imported into FirstSpirit. This is particularly important when you feel your translations are not inserted into the correct fields.
|
To obtain the raw source data:
|
You will find a new directory in translationstudio’s application directory ./working/temp/export_* which contains all raw data including the translatable XML.
|
To obtain the translated data imported into FirstSpirit:
|
You will find a new directory in translationstudio’s application directory ./working/temp/import_* which contains all raw data.
2.3. Mail
translationstudio distinguishes between three kinds of mails:
-
Notifications on translation requests and status changes
-
Error messages popping up during any operation (will be sent to the administrator’s email address)
-
Additional mails such as connector notifications or health service emails
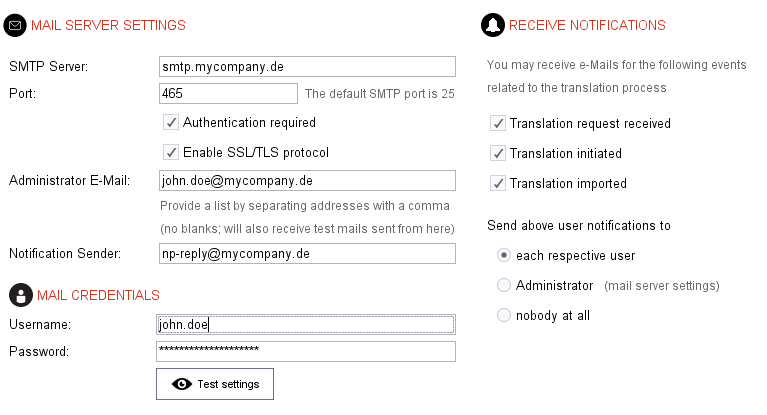
You can test the connection and send a test e-mail to the administrator by clicking Test Settings.
The Receive Notifications section allows you to fine tune which kind of emails you would like to receive. By default, a notification will be sent to each user who requested a page or dataset to be translated. Whenever a status change occurs to this page, an email will be sent to the user if provided in the FirstSpirit user configuration. However, you may also only send all email notifications to the administrator’s email. Finally, you may also deactivate any user notification by sending notifications to nobody.
Information on the Mail Server
User notifications use FirstSpirit’s email settings which are set elsewhere. You may, however, decide not to use the FirstSpirit mail service by deselecting the respective box on the lower right.
2.4. Quota Configuration
Quota configurations allow controlling when and how pages and datasets registered for translation are processed and when a translation job is actually being initiated.
There are 2 types of configuration available
-
Default Configuration
-
Custom Configurations
Importantly, both types do not differ in terms of available options.
The default quota configuration can be used at any time and will also be used in case a previously defined custom quota configuration is removed from this list although there are elements already registered for translation.
You may add unlimited custom quota configurations under the respective tab’s panel.
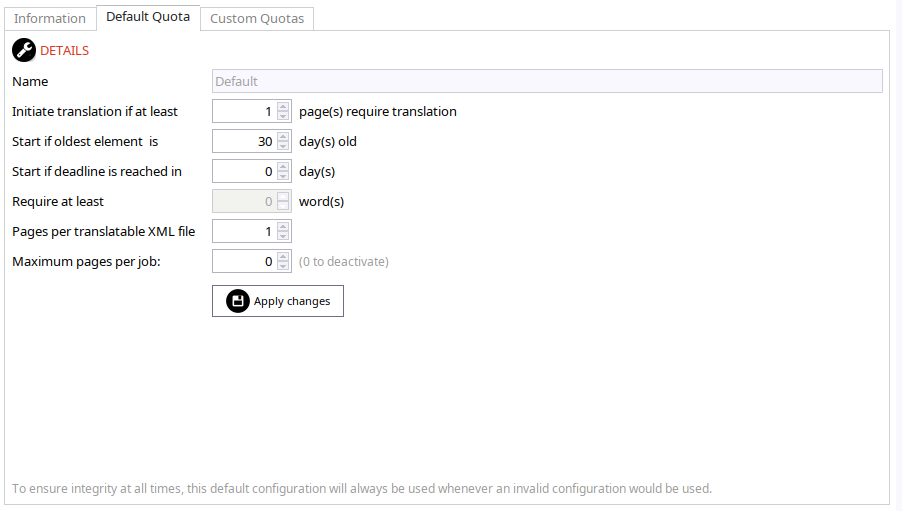
The available settings will be described in the following:
-
Configuration Name
(custom quota only) This name will be used to identify the job within the module. -
Initiate translation if at least X page(s) require translation
Set the minimum amount of pages required before a translation is actually initiated. Note: Datasets will be regarded as single pages. -
Start if oldest element is X day(s) old
If the oldest element waiting to be translated in FirstSpirit has not been committed for translation after the amount of days specified here, a translation will be initiated regardless of the other criteria above. -
Start if deadline is reached in X day(s)
Each translation request might have a date at which the translation is due. Since every translation requires time, this setting allows you to configure the number of days waited before the expected date of completion would be reached and to finally initiate a translation process. -
Maxium number of pages or datasources per job
Limit the absolute number of pages/datasources to be added to a single job. -
Pages per translatable XML file
Once a job has been processed, this setting determines the amount of time until another job will be processed. The minimum delay can be used to force that a certain amount of time is in between to exports.
| A translation will be initiated if at least one of the above criteria is met. |
A zero value in Number of pages required or Start if oldest element is X day(s) old deactivates the respective criterion.
A negative value for Start if deadline is reached in X day(s) deactivates the respective criterion.
| All changes made will only be stored if you click on the “Apply Changes” button. |
2.5. Connectors
Connectors are used to connect to various Translation Memory System (TMS). The following types of connectors are available.
-
Default Filesystem Connector
-
Amazon Web Services (AWS) Connector *
-
DeepL Connector *
-
Google Translate Connector*
-
Additional Custom Connectors
| Connectors marked with an (*) provide machine translations and the result should be reviewed. There will be no guarantee regarding the correctness of the translations created by any machine translation system. |
The Filesystem Connector can only be configured but not removed. It will be used if no particular connector is required.
The AWS, DeepL and Google Translate connectors can only be used if you provide valid credentials and access keys in its respective configuration panel.
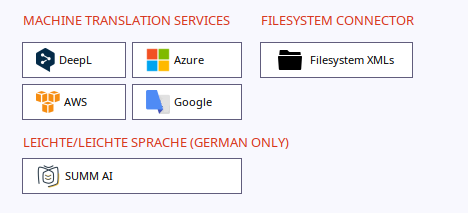
Custom connectors require additional configuration and can be added as needed.
| You can activate the TranslationHelper plugin by activating the feature in either of these connectors. |
| If your translationstudio is hosted in the cloud, you do not necessarily need AWS credentials. Please contact your administrator for further information. |
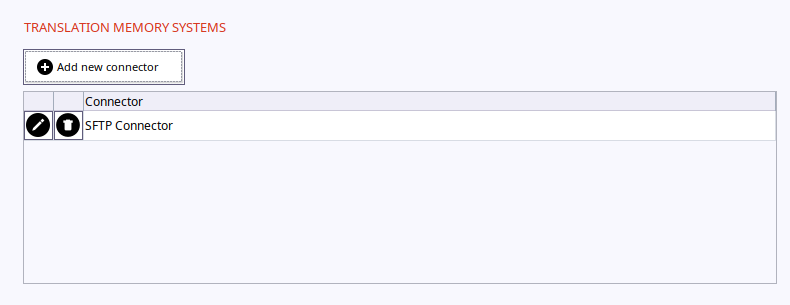
The custom connector panel consists of 2 areas:
-
List - A list of all connectors available to translationstudio
-
Details - Provides details to configure and use the respective system connector
New connectors can be added or removed using the respective icons next to the list and 3 pieces of information are required for each available system in order to work properly:
-
A name has to be provided which will be used to address this system when referring to it in FirstSpirit
-
The
Configurableentry holds the fully qualified class name which implements theTranslationMemorySystemConnectorConfigurationGuiinterface from the connector API. -
The
Connectorentry holds the fully qualified class name which implements theTranslationMemoryConnectorinterface from the connector API.
You can (optionally) load the required data from a connector’s xml file which makes this installation easier. The xml file must follow the xml structure shown below (using data from the above screenshot to provide sample data). You can load the file using the load from file button in the upper right.
<?xml version="1.0" encoding="UTF-8"?>
 <connector>
  <name>Custom Connector</name>
  <configurable>com.mycompany.connector.configuration.Panel</configurable>
  <instance>com.mycompany.connector.instance.Connector</instance>
  <xml-connector></xml-connector>
  <xml-gui></xml-gui>
 </connector>
To configure the respective connector, click on the Configure button. Importantly: All changes made to the connector configuration will have to be confirmed using the Apply Changes button.
Please note: each connector provides a list of available projects. For example, a given TMS might provide specific projects for certain language pairs, e.g. from English to German or from English to French.
Other connectors, such as the filesystem connector only provide one single project. Importantly, each project has a unique id which is used to identify the respective project in the TMS. The list of available projects per connector is forwarded to FirstSpirit and available to projects and language mappings.
Depending on the connector and the underlying Translation Memory System (TMS), some TMS projects might be deleted or removed and, consequently, wont be available to translationstudio anymore.
Yet, existing language mappings might still have stored the id of the removed TMS project. Thus, it might be necessary to change these mappings and choose other target TMS projects or to remove the respective language mappings from the FirstSpirit project.
However, if a translation is requested using a language mapping with an invalid TMS project, the element might not be processed. Consequently, make sure that language mappings always use existing TMS projects.
Connecting to Translation Memory Servers
Sometimes, a connection to a Translation Memory Server may fail because the server uses self-signed certificates, for example. In that case, you have to add the certificate to the JDK’s default keystore on the server running the translationstudio Application.
2.6. Processing
This section contains several features which may be made available to translationstudio or not.
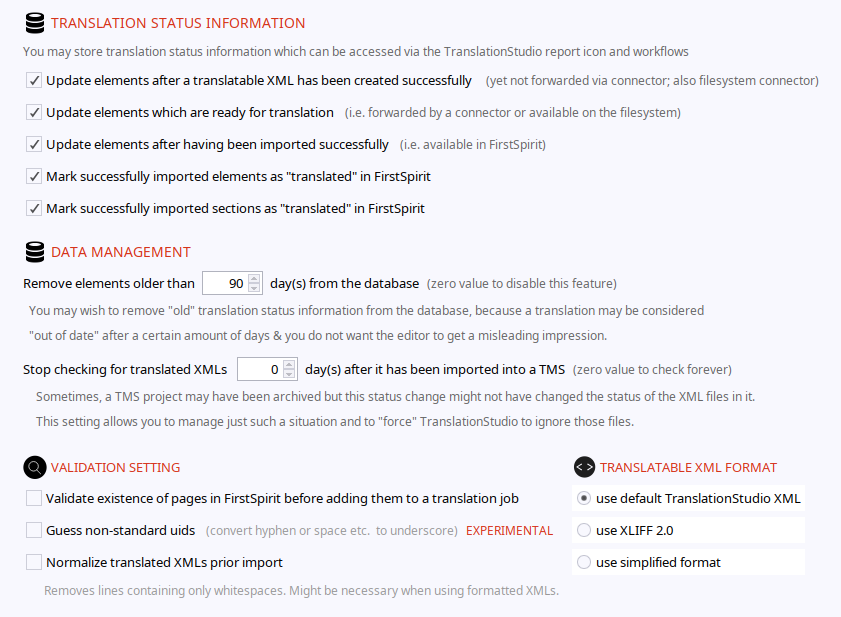
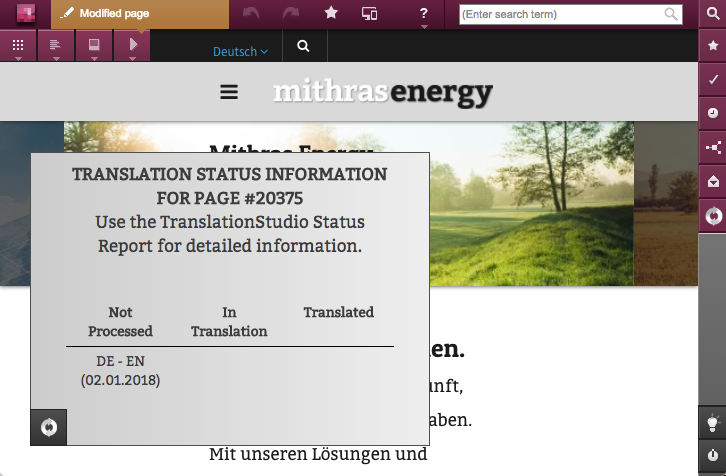
Translation Status Information
allows you to specify which kind of translation status updates you want to track and if an imported element is to be marked as "translated" in the CMS.
translationstudio keeps track of all the translation requests and you may choose to remove stored information which is older than a given number of days.
Validation Settings
provide features to validate the existence of elemnts about to be translated before actually adding them to a translation job.
translationstudio requires alphanumeric uid names as given by the SiteArchitect. Unfortunately, it is possible to add spaces characters and others. This causes problems when exporting the data to the filesystem (because they are mapped to the standard uid convention). Thus, translationstudio will not find it, but it may try and translate those non-standard uids. We strongly urge you to use standard uids, because this may cause data confusion and data loss!
Sometimes, translated XML files contain structural formatting (indentation, new lines, etc.) which may cause problems for the CMS during the import. Importantly, you may choose to remove such elements. This usually is unnecessary if you use a connector/TMS.
Translatable XML Format
translationstudio supports various XML formats and you may chose either of them as needed.
Metrics
translationstudio can collect metrics (word count of imported XML files and the pages/sections/datasets affected, number of files) which may be relevant for your company. If you receive a monthly summary by providing an email address (list) here. you have to activate metrics in the Monitor section.
2.7. Plugins
This section allows you to add hooks in a convenient way. Simply add the hook’s respective package and class name implementing the hook interfaces.
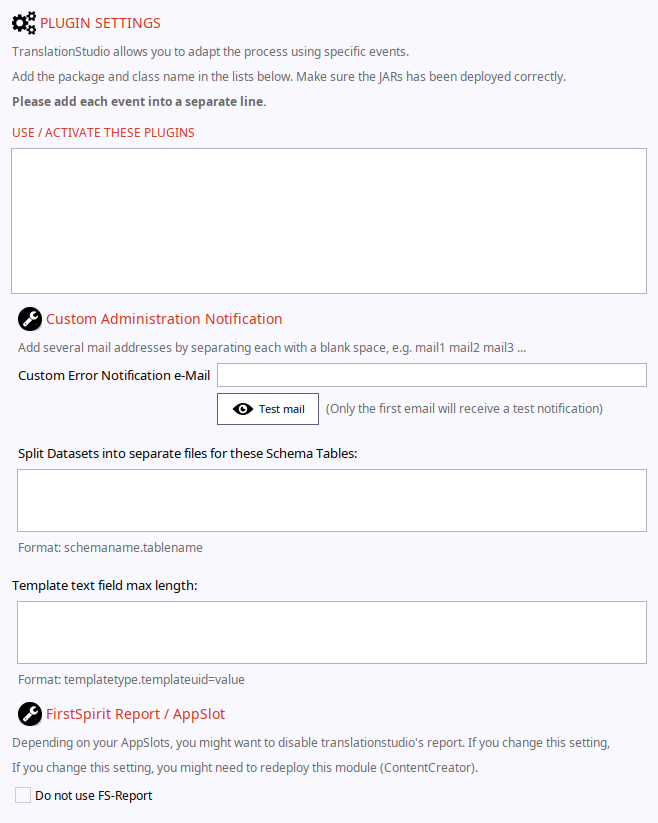
| Make sure the JAR libraries are already available in translationstudio. |
2.8. Monitor
translationstudio provides tools to monitor the application and to react to specific situations.
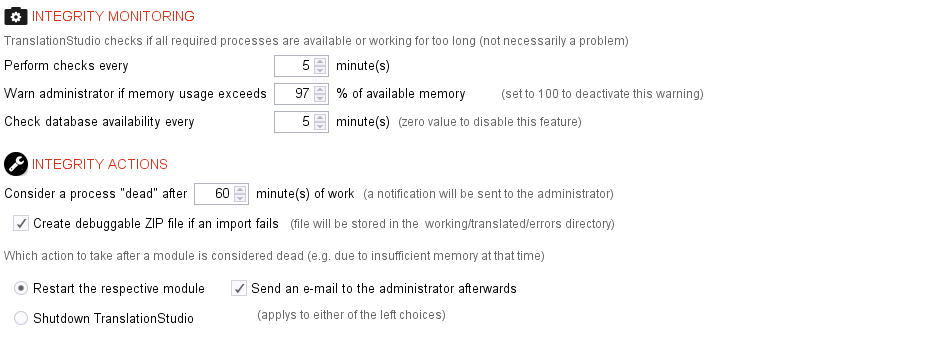
You may decide how often a check is to be carried out.
translationstudio is able to identify if a core process has died unexpectedly (e.g. due to an out of memory error) and to respond to such an event according to the settings provided here.
2.9. Distribute
translationstudio can be installed automatically whenever you its project component to a FirstSpirit project.
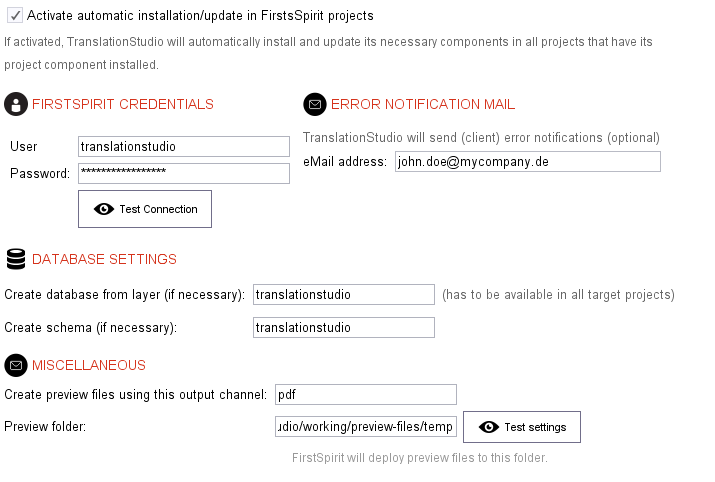
If you want to install translationstudio simply by adding its project component automatically, you will have to meet the following requirements:
-
translationstudio has to be able to create its own schema by using an already existing database layer.
-
The layer has to have already been added to the project with active schema sync.
3. Migrating your Configuration across FirstSpirit Servers
If you have successfully installed and configured translationstudio on a server and would like to migrate it to another server (e.g. DEV to PROD), you have 2 options.
-
Configure translationstudio again on your target server
-
Copy the configuration files from source to target server.
You can always update the configuration once you have migrated it via translationstudio’s configuration interface, of course.
| The translationstudio Module has to be installed on your target server first. |
If you want to copy translationstudio’s configuration files, you can access them inside your FirstSpirit folder at
./conf/modules/FirstSpirit translationstudio.translationstudio Service and Configuration
Essentially, translationstudio’s configuration is stored in these 2 files:
ts-core.properties
ts-curstom.properties
If you want to use the automatic distribution feature (and use the exact same data), you will also require ts-cloud-technical-user.properties. However, this can also be added later or configured later.
To copy those files, follow the steps below
-
Stop the translationstudio service module component on your target server
-
Copy the properties files from your source server to your target server
-
Start the translationstudio service module component on your target server again.
-
Open translationstudio’s configuration interface to check the result and click on
OKto send it to translationstudio.
| You may need to change translationstudio’s URL and API key if necessary. |
Your connector projects should be available in SiteArchitect immediately, but caching may prevent them from appearing. If so, simply restart your SiteArchitect again.
4. Configuring a FirstSpirit Project
In order to use translationstudio in your project, the project component has to be added to the project and the installation script executed.
4.1. Configuring Language Combinations
Usually, you do not want your editors to decide which translation language combination and TMS is to be used. This may result in illegal language combinations.
Therefore, supported combinations have to be created. Thereby, you as administrator define which languages can be used as source languages and which languages will be translated into.
To create a mapping, navigate to the Mappings folder fts_configuration in the Global Content Area and create a new page template using the template fts_gca_mapping as shown below:
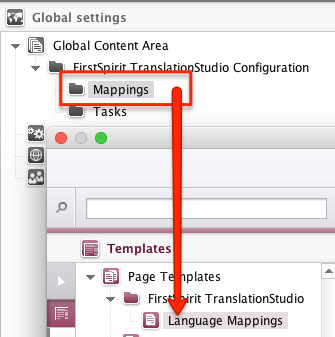
Attention to Visibility
The template Language Mappings is configured to be visible by default. That is because you should be able to create new Language Mappings immediately after installation. But we recommend setting the template to hidden, when you have create all language mappings needed.
To do this, open the properties of the template Language Mappings and change the attribute In selection list to hidden.
The new page contains a list of language mappings in which translation directions can be configured. The list will be processed in parallel.
Each language mapping entry has 3 boxes
-
Source Language
-
Target Language
-
Connector Project
On start-up, the TMS Project list will only include a Filesystem project.
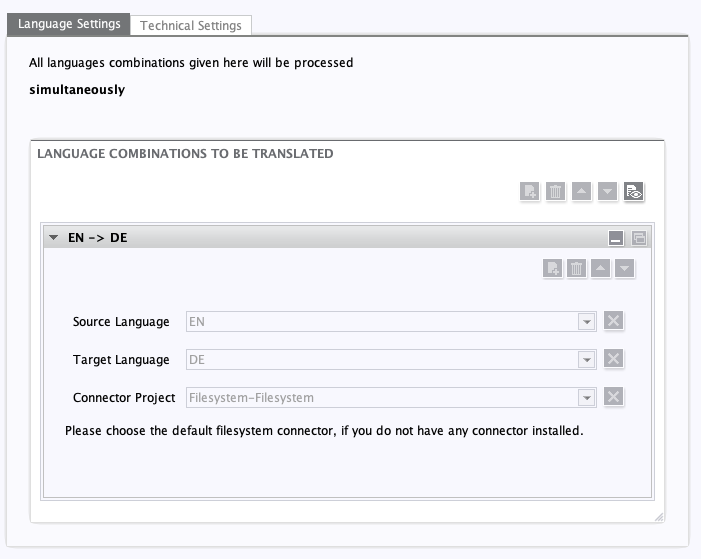
Once all languages for a mapping have been defined, the page can be closed and saved.
| You can set permissions to restrict visibility of each translation language mapping page to reduce the complexity for your users. |
Pre-assigning specific language mappings to certain folders
It is possible to assign default mappings to any folder, which, of course, can be changed by the user individually if necessary. For example, if the default translation mapping is German to English, this mapping can be assigned to a folder using the meta data form of the respective element. However, the assignment might be changed on the workflow form (see below) any time.
For example, if you want to set the above mapping as default for the entire page store, select the Page Content root element in the SiteArchitect, open the meta data form and follow the instructions as depicted below:
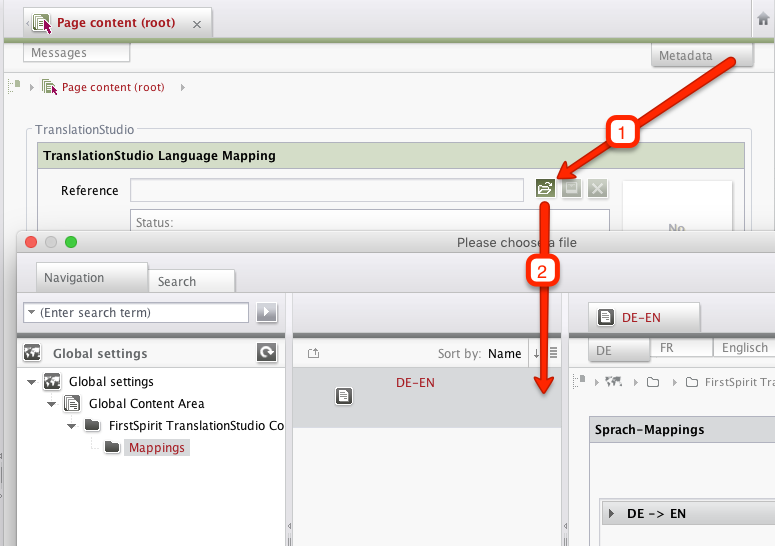
As a result, the form which is provided whenever a user starts a translation workflow has the above pre-selected language mapping. This default value can be changed any time by simply choosing another page reference.
Limitations
It is not possible to pre-assign language mappings for datasets using metadata. However, you may want to set default form values in the register_dataset script.
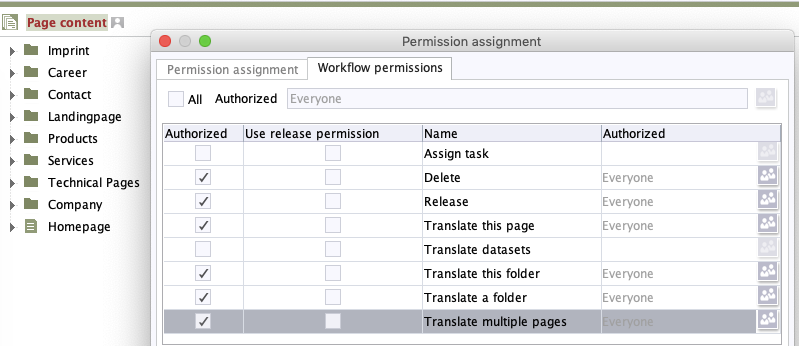
4.2. Setting Workflow Permissions
translationstudio uses workflows and permissions have to be configured. This has to be done for the Page content, Data sources and Structure separately.
Use the respective context menus on the top level items. The actual configuration depends on your project configuration. In the example below, the permissions to use workflows will be granted to the group Everyone.
| You may want to restrict the workflow permissions to specific groups for specific parts of the project. |
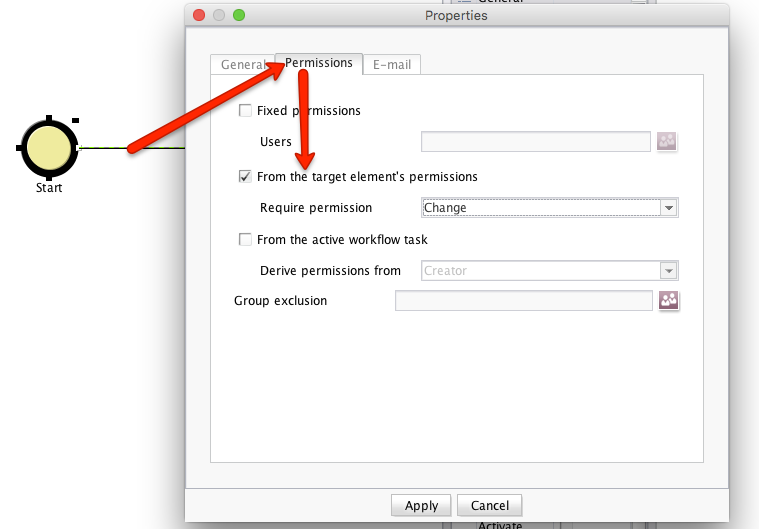
Each workflow contains a number of different transitions which may have specific permissions to be executed. By default, each transition requires the user to make changes to the element the workflow is being executed on. You can change this at anytime as shown below.
| If you are looking for more information concerning the administration of workflows consult the FirstSpirit documentation. |
4.3. Setting Scheduled Task Permissions
Scheduled tasks are required to submit translation requests and are created automatically.
Default Group Permissions
All essential tasks have been created during the installation process automatically and user group permissions set to "everyone". You may change this at any time.
translationstudio knows which task to execute and you do not need to worry about this.
4.4. Adding a Status Indicator Icon
A status indicator icon allows you to access available translation status information in a page preview.
To add this feature, please paste the following JavaScript into the respective page templates:
$CMS_RENDER(template:"translationstudio_statusicon")$
Importantly, this template requires the existence of a global web application.
4.5. Extending the translation request form
It is possible to add custom fields to each of translationstudio’s workflow script forms. In generall, the following input components are supported:
-
CMS_INPUT_TEXT -
CMS_INPUT_TEXTAREA -
CMS_INPUT_RADIOBUTTON -
CMS_INPUT_COMBOBOX -
CMS_INPUT_DATE
You can edit the dedicated script template translationstudio_customfields to add those custom input components. TranlationStudio will automatically load this form XML and add it to its workflow form and even keep the defaults set here (if available).
Oncce created, this script template will never be overwritten by translationstudio again.
There are 2 options available to work with the custom input data from your custom input components:
-
Add a custom hook to process the data (
ICustomMessageXmlHook) -
Add template fields (see below).
translationstudio allows you to add 2 template fields which can be used as a template (these wil l also be described in the custom fields template). If custom input data is available, a separate file will be created alongside the translatable XML files.
-
st_fts_custom_file_typeSet the custom file name extension. A txt file will be created if no extension is provided. The file type will always be converted to lower case automatically. -
st_fts_custom_file_contentSet the custom file’s content. You can use placeholders to replace with the actual custom data later. Those placeholders follow the format{input-component-name}
Please Consider
If you add custom fields, you have to implement your own ICustomMessageXmlHook hook to make use of them. Both, the hook and the connector, are able to access the pages and sections included in the translatable xmls using translationstudio’s API. The custom field’s data provided by the API is identical to the message XML value in each translation task ticket (i.e. you have to parse and process it accordingly).
4.6. Activating the Immediate TranslationHelper
You may add an immediate translation helper by installing the necessary content creator web components.
| You have to add the web component to all projects that wish to use the TranslationHelper as described in the installation manual. |
In addition, you will have to configure the Amazon Web Services, DeepL or Google Translate connector and activate the flag Allow this connector to perform direct translation attempts.

If activated, a new icon will be visible in the ContentCreator:
Clicking on this icon will cause a new dialog to appear which requires the user to configure the source and target language for the translation task ahead. Thereafter, the user can request an immediate translation using the Amazon Web Services connector (see above).
| The immediate translation has to be reviewed at all times before accepting and saving it. Some formatting may be mixed up due to the target system’s html processing mechanisms. translationstudio cannot influence this process. |
To limit access to the TranslationHelper, you can add the following CMS_INPUT_TEXTAREA fields to your project properties template.
  <CMS_INPUT_TEXTAREA name="pp_translationstudio_translationhelp_users" useLanguages="no">
    <LANGINFOS>
      <LANGINFO lang="*" label="Restrict TranslationHelper to the following list of users (one per line)"/>
    </LANGINFOS>
  </CMS_INPUT_TEXTAREA>

  <CMS_INPUT_TEXTAREA name="pp_translationstudio_translationhelp_groups" useLanguages="no">
    <LANGINFOS>
      <LANGINFO lang="*" label="Restrict TranslationHelper to the following list of user groups (one per line)"/>
    </LANGINFOS>
  </CMS_INPUT_TEXTAREA>
When using ContentCreator, the current user will be checked against any potential restriction. If the given user matches at least one (name or group), the permission will be granted.
4.7. Hiding Translation Memory System Report Filter Options
If you do not want to include Translation Memory System filter options to your list of report filter options, you can add a language independent CMS_INPUT_TOGGLE input component with the name pp_translationstudio_hide_report_tms to your project properties template.
To activate the setting in the ContentCreator, you will have to restart the web application after having made changes to this field.
4.8. Adding a Release Mechanism to Your Translation Requests
By default, translationstudio will automatically send your translation requests to the TranlationStudio Application right away. Yet, if you do not wish this to happen, there are 2 options.
-
Editing the workflow
You can change translationstudio’s workflow and change the script to be execute after the translation request has been stored in the database in FirstSpirit. Do not remove the success transitions but simply change the script attached to the respective activity. -
Require a release of translation requests before sending them to the application
If you want translationstudio to only process released request datasets, you can add a language independentCMS_INPUT_TOGGLEinput component with the namepp_translationstudio_require_acceptto your project properties template. Keep in mind: You will have to manage the release of the datasets yourself.
4.9. Skipping the Reference Name Validation
translationstudio requires lowercase alphanumeric reference names which may include an underscore - i.e. the pattern FirstSpirit uses by default. Since the API allows you to add any kind of reference name, you may include characters that may cause problems. The export operation will automatically convert such reference names to the default pattern. However, this may cause problems identifying which "invalid" reference name belongs to which converted name.
Importantly, translationstudio will check for such "problematic" reference names before showing the translation request form and, if necessary, include a warning. If you do not wish translationstudio to check for such reference names, you can add a language independent CMS_INPUT_TOGGLE input component with the name pp_translationstudio_skip_uid_analysis to your project properties template.
| It might be valid to skip this check, but keep in mind that it may still cause problems during exports and imports. |
4.10. Excluding a navigation element from being translated
When translationstudio translates a page’s label and display name, it automatically detects all navigation references (i.e. PageRef) and their respective parent folder (i.e. PageFolderRef).
Sometimes, you might want to exclude this folder (or its page, i.e. PageRef) from translation. To do you, you can add a CMS_INPUT_TOGGLE form element to your meta data template:
<CMS_INPUT_TOGGLE name="mt_ts_donottranslate_folder" useLanguages="no">
  <LANGINFOS>
    <LANGINFO lang="*" label="Do not translate this navigation page or navigation folder (if applicable)" />
  </LANGINFOS>
  <OFF>
    <LANGINFO lang="*" label="Please translate"/>
  </OFF>
  <ON>
    <LANGINFO lang="*" label="Yes, to not translate"/>
  </ON>
</CMS_INPUT_TOGGLE>
5. Customising the Workflow Form
It is possible to customise the workflow form and to meet your needs and also to reduce complexity if need be.
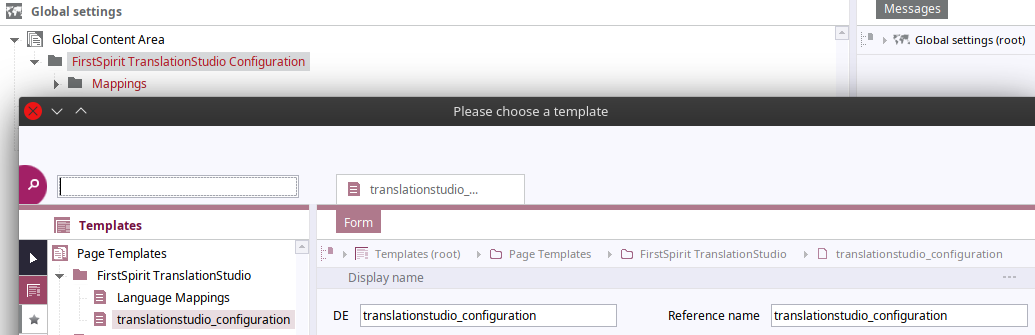
You have to create a global content area page using the page template translationstudio_configuration. When executing any translationstudio workflow, the configuration page is obtained by reference name convention. Any changes to the configuration will be effective right away.
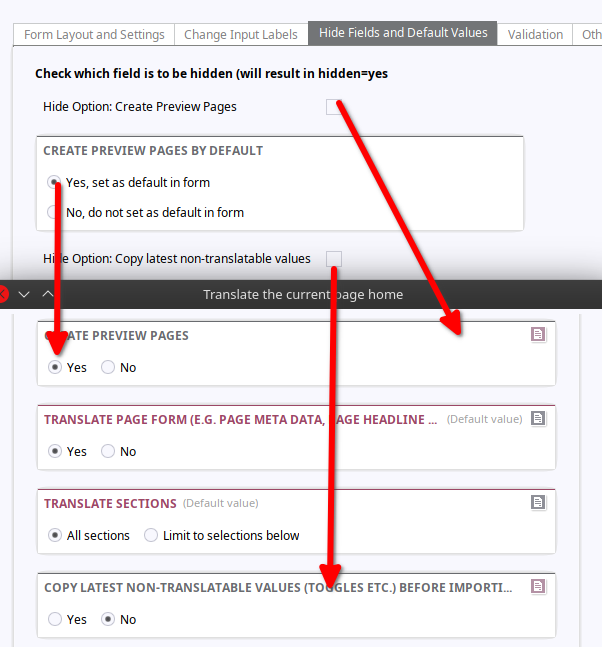
The page’s reference name has to be translationstudio_configuration. The display name can be changed.
|
The configuration page allows you to
-
rename the workflow tabs
-
rename the "request translation" submit label
-
rename several labels
-
skip UID validation
For example, you can change the form’s tab labels and the submit label.
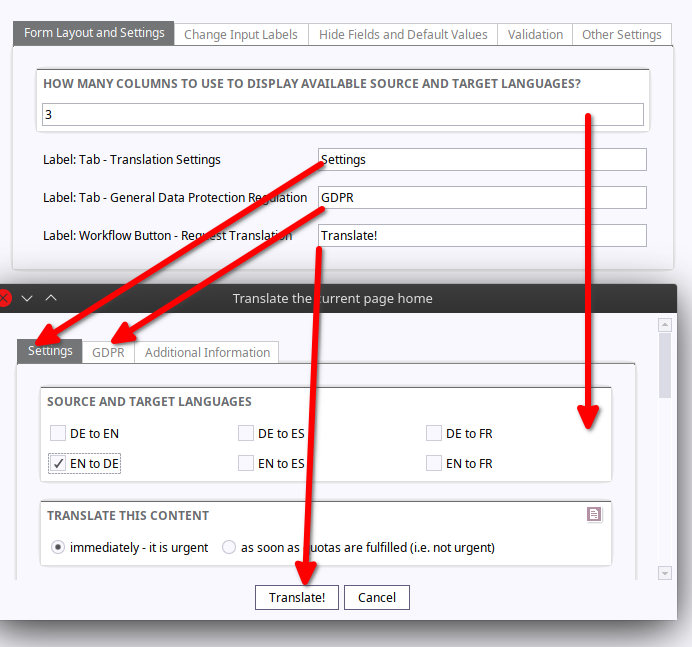
Various other form field labels can be changed as well.
| If you do not want to change a label, simply leave it empty. |
Changes will take effect immediately after having saved this page.
6. Configuring a FragmentCreator Project
To make use of translationstudio in a FragmentCreator project, you only need to configure language combinations as already described above. The forms differ due to a different language mechanism in a FragmentCreator project.
| A FragmentCreator project does not support TranslatonStudio’s Status Indicator Icon or the Immediate TranslationHelper |
There is no need so set workflow permissions, because they will not be used.
| Unlike to generic projects, you cannot extend the translation request form in a FragmentCreator project. |
Once your language combinations are added successfully, they will be available to the translationstudio MicroApp.
7. Adding Extended Monitoring Tools
You can install the translationstudio Monitoring Tools project component to any of your FirstSpirit projects (the component is not project specific). Once added, it only offers a configuration interface but does not install anything to the project itself (templates etc.).
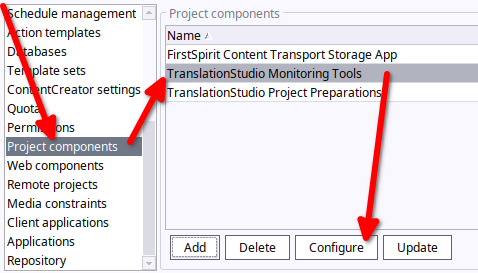
The monitoring tools component allows you to
-
Download translationstudio log files (current file only or all as ZIP file)
-
Download translated XML files (both successfully imported or failed)
-
Upload translated XML file (e.g. after having made changes to it) and thereby adding it to the import queue
-
Download and make changes to monitored files in translation table (this is particularly useful if you want to re-download an already translated document or remove "old" entries, etc.)